
This is Part One in a series of posts concerning Mechanical Integrity Inspections. In this entry we will highlight the Inspection Template Form within the Inspection Builder and the options available within the Builder. Later entries will outline your options in performing Inspections using these Forms.

Within the Inspection Builder, for each location you can manage your Inspection Templates that will be used for Mechanical Integrity Inspections against your covered equipment. You can Create, Edit, View, Copy, Print, and Delete these Templates.

When creating an Inspection Template you have the choice of linking to a single Equipment Nameplate Template. Equipment Nameplate Templates are a set of fields that are unique to a set of Equipment. For example: Evaporative Condensers Nameplate may consist of fields for Equipment Data, Fan Motor Data, Pump Motor Data, etc… Typically this data is static and does not change. The benefit to your Inspection Templates if you are using these Nameplate Templates is you can link to these fields and when performing an Inspection for the piece of Equipment the data from the Nameplate will populate the Inspection.

There are 8 different Field Types that can be used when building an Inspection Template. They are listed below along with a description of each.
| Field Type | Description |
|---|---|
| Text Field | A user-entered field that can accept any value |
| Date Field | A user-entered Field that only accepts a date |
| Number Field | A user-entered field that only accepts a number |
| Radio Button Group Field | A group of pre-defined checkboxes, any combination can be checked at once (can be used to trigger a Work Order) |
| Checkbox Group | A group of pre-defined checkboxes. Any combination can be checked at once (can be used to trigger a Work Order) |
| Equipment Field Value | The Field value will be automatically entered values entered by the associated equipment item (cannot be edited) |
| Equipment Nameplate Field Value | The Field value will be automatically entered values entered by the associated equipment item (can be edited) |
| Signature Block | Field will contain name, date, and signature (if available) of person who authorizes the Section |
| Label/Header | A non-editable label for additional information or as a header for column |

When adding a Field to a Row within the Template you also choose the width of that field in that Row. The Row itself has a total Span of 8. So you can add Fields to a Row that total a span of 8. For example: you could have a row with 1 Field that spans 8, or a row with 2 fields that each span 4, or a row with 4 fields that each span 2.

When adding a Field to a Row within the Template you also choose to either include the data when copied or not. This means if you have data that typically always remains the same and is not being pulled from an Equipment Field or a Nameplate Field, and you want to save time by not having to re-enter this information, if you check this option for the field then it will take the value entered from the last inspection and populate to the new inspection.

When using a Radio Button or Checkbox Field you can have a Workorder created based on certain selections. Any of the options Checked will result in a Workorder being generated if these checked options are selected within an Inspection. This can assist in follow up actions for Inspections that result in issues found.

When you have Finished building your Inspection Template you are able to Preview it prior to publishing it by using the Print Icon. This can assist you in finding issues with the layout prior to Publishing.

To be able to use your Template in an Inspection the Template will need to be Published first. You can Publish by selecting the Publish Icon. Publishing a new Version of an existing Template will update existing open Tasks/Workorders that are linked to the Template.

If you have a version that is Pending Publish you can cancel the changes and revert to the previous published version by selecting the Revert This Version Icon.
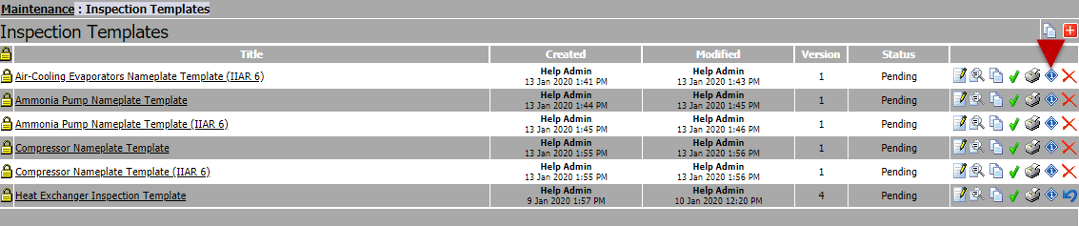

To view previous versions of the Inspection Template you can select the Show Versions icon. You can then open a PDF of the version you want to view. You also can see who and when the version was created, modified, and published.

If changes are needed you can create a new version of the Template by selecting the Create New Version Icon. This will generate a new version that is then editable and Pending Publish.
For more detailed information you can access the Online User Guide https://help.wbbmportal.com